Wednesday, December 24, 2014

Merry Christmas


I hope that your many trips to the fabric store are completed 
and that you have ALMOST every thing wrapped.

I did make 2 trips to Joann's this week. I bought my first package of 
leather needles 
only to break 4 of them on one project!

I am grateful for the the birth of our Savior Jesus Christ.

MERRY CHRISTMAS

Monday, December 15, 2014

No Peeking


Ok Folks....We've hit the official Chistmas Season, so there's no peeking at your gifts.


I wanted to share a few things I've been up to recntly, but that would give 
all my gifts away, so here's just a few things I can share.


I've been making Christmas Cards, but they still need to be assembled. 
My 13 year old pointed out a spelling error to me AFTER 
I brought them home from the printers. Aggghhhhh!
Look for our card in your mail box early next week.  

I put in a zipper on a a really cool gift.

These are pillowcases made with French seams.  My favorite is the typewritter fabric.

Found some fun Chanukah pasta for a friend. 
We've been invited to our first Chanukah party this year. 

Finally found a good use for the chalk borad heart garland I bought to use at Claire's wedding reception, but didn't use at the reception. 
I made up this little decorative font and decided to use it more this Christmas.

More chalk board fun. I put this one up in the kitchen. 

This banner stretches across the entire front of the kitchen.

Just had to make a banner for our church Christmas Party. 
I was under the gun on this one. 
I had one hour to get it done while I helped one of my daughters make 
brownies, for the first time, from scratch for the party. 
As I was hanging this sign I accidentally mis-spelled Chrismtas. 
Good thing it was an easy correction.

Christmas isn't just about getting things done though. 
We went to a Messiah Sing-In last night. 
Our family has been attending for about 8 years now. 
I am convinced that it's one of the best ways to celebrate 
the real meaning of Christmas. 

MERRY CHRISTMAS


Friday, December 5, 2014

BEST GIFT EVER.... The Sew Together Bag


Links for instructions and tutorials are at the bottom of the page.


You know my friend Lisa?...the one I've nominated for Sainthood? 
(Haven't heard back from the Vatican yet, I guess there's competition.)

She recently asked me for some of my favorite fat quarters so she could make me a 
Sew Together Bag for Christmas. I was INCREDIBLY excited about this. 

These bags are amazing! 

They have so many pockets and are a wonderful for organizing supplies when you're on the go. I went to my stash collection and handed over a stack of fabrics I bought at Eliane's Quilt Block. Here's a sampling of the fabric. 


Lisa had an amazing selection of zippers for me to choose from. 
Please tell me it's normal to get excited about a project with different colored zippers!


This is one of my favorite pockets. 
I love opening it up to find the jumbled up text inside. 
That's the graphic designer in me having a party! 
Just so you know, seeing a font out of place like this makes me smile.


Here's a sweet note that I found inside.


Here are some links for making your own sew together bag. 
My friend 
Elizabeth from OccasionalPiece.wordpress.com 
has two fantastic tutorials about making this bag. Elizabeth has posted a link to purchase the instructions on her blog.

#1 http://occasionalpiece.wordpress.com/?s=sew+together+bag&submit=Search

Elizabeth has also posted a mini sew together tutorial.

#2 http://occasionalpiece.wordpress.com/2014/12/03/mini-sew-together-bag/

Sew Together Bag is by


Happy Christmas Sewing!


Thursday, November 27, 2014

647 Miles & 448 Inches

Recently we took a little trip and drove 647 miles. 
This is what most of the road looked like.


                                     I thought this would be a great opportunity to 
                                              finish binding 448 inches on a quilt. 
                                   This ginormous quilt sat on my lap for the ENTIRE TRIP.

The quilt was fun to make for Claire & Conrad, 
but this may be my first and last time I make a quilt this BIG
It was just so much material to work with on my tiny Husky Star sewing machine. 
I even borrowed a friends sewing machine just so I could do an appliqué stitch.
Lisa Johnson did a wonderful job quilting the abacus design! 


I also picked the windiest day ever to take a final photo, 
which added it's own element of challenges. 


  Happy Thanksgiving! Eat lots of PIE!!!

Friday, November 21, 2014

Orbit

After attending the Road to California Quilt Show this year my mind began to ignite with quilting ideas, so I decided to start a quilt journal. One of the ideas was to have 3 circles of varying size & color on a gray background. The idea was to have the eye bounce through the 3 circles and then have 3 smaller circles within the circles that would continue through the rotation of the colors in the circles. For example the large circles in the illustration below, starting from the left are blue, yellow and pink. (I hope that's not confusing to see the word blue written in the color red, I'm NOT messing with you, at all.)  I then wanted the small circles to follow the same pattern of blue, yellow and pink. I think this is where the graphic design techie part of me comes out. I like to measure everything and have calculated plans. I can drive myself nuts doing this. 


This plan was drawn in Illustrator.


I then made another version of my document that was in outlines only.
In the print dialogue box I checked "tile" so I could print out 
 my big circles and tape them together. It would have been easier 
to take my file to Staples and use their oversize printer,
 but I didn't want to wait. 
I'm not impatient... just excited. 


Unfortunately I didn't have the same colored fabric in my stash 
that I was dreaming about when I drew my plan 
in Illustrator, so I used what I had. 
This was my first time using a satin stitch on a quilt. 
I was so new to quilting that I didn't think I could applique the circles 
straight onto a single piece of background fabric, so I pieced the gray
 background together.
No cheating allowed! 


As I worked on the quilting ideas I decided to use mathematical symbols
 for inspiration (it also helps that my husband is a scientist). 
I augmented these symbols and placed 
them in the middle of the circles. 
Here's some of my math symbol inspiration. 


Above is an acute angle symbol. I also decided that the remaining quilting needed to compliment the techie math symbols already in the quilt. 
Quilting something structured and rigid over the
GRAY
 area seemed like a match to me, so to I decided to go with LOTS of 
criss-crossing and overlapping concentric circles. I was finally able to use all that neon thread I've been collecting. For each of the 3 circles I quilted radiating circles in 
their own matching color. 


In this photo I'm quilting a right angle symbol. 
I also quilted in a small grid system in some of the 
negative space opposite of the right angle. 


I chose an orange and white chevron stripe for the binding, which continued 
the idea of concentric radiating circles, but on a VERY LARGE scale. 

Also, in the photo above you can see the varying shades of blue concentric circles quilted and radiating out from the blue/aqua circle detail. As you look at the detail of the orange circle you can see that all the radiating quilted circles are varying shades of orange. I also ran 2 threads through the machine at once to help build up the threads that were wrapping about the large circles. 


I decided to title the quilt ORBIT. 

After I was able to stand back and really look at the 
quilt I immediately thought about how planets have a 
natural orbit in space. All the quilted concentric circles started to 
look like trails left by moons and satellites that 
had once circled their planets.


Friday, November 14, 2014

IKEA and I think alike.

I have been working on a quilt for my oldest daughter, 
Claire and her husband Conrad. 


Claire saw a quilt on line that caught her eye. I am sorry that I don't have any 
information on who to credit this great quilt to. 


I drew up a preliminary plan on Illustrator which I have tried to place here, but Google + shuts down every time I get near it with a technical drawing in any of their accepted formats ! You will just have to imagine it. 

During my last visit with Claire we headed off to Elaine's Quilt Shop. http://www.elainesquiltblock.com/shop-online.htm. We had a great time.  A great time means spending 2 1/2 hours foraging through tons of fabulous fabric. I am sure the employees were sick of the mess we made. We used their upstairs area as a design studio to lay out all of Claire's color options. She chose this fabric for her inspiration.

I completely loved the combination of the greens and blues with an occasional pink, so we searched high an low and found more fabric that complimented her inspiration fabric from Elaine's and Hawthorn Threads. 


Then Claire found this gem on line at Hawthornthreads.com for her backing fabric. I really liked that she found something with green & navy in it to continue the color theme. 


I picked out the background fabric that the big circle would be placed on. I decided to use a Kaufman Wide Screen Fat Back in Silver. I really liked not having any seams on the front. I thought it would help carry across the minimalist concept of having just a big circle on the front of the quilt. Here's what's left from the Fat Back. 


I bought a 10 degree wedge ruler and modified it to work with the plan I drew up in Illustrator. 

Here's a picture with the wedges sewn together and pinned on the Fat Back. I sewed the big circle on with mono filament thread. 


It's so big, I've been calling it the gray whale.


When I searched on line for quilting pantographs that would be suitable for this quilt I stumbled across one that caught my eye. It's called Abacus. 

I thought this was a great match. The small circles mimicked the larger circle on the front of the quilt. I liked the idea of using a minimalist quilting pantograph since the quilt design is so simple to begin with. 


Now enters IKEA. While I was shopping there this week I stumbled across the abacus design EVERYWHERE!!!

I just had to buy the gift wrap.

Here's our dog Charlie hanging out on our new door mat with the abacus design on it also. 

I think IKEA and I are blood sisters. It was really fun to see the quilting design I just chose for Claire and Conrad's quilt all over the store. 

Now all I have to do is to bind the world's largest quilt. I designed the quilt to generously fit a queen size bed. 


I think I'm in love with the abacus design even more after Lisa Johnson spent 6 hours quilting it. She did a wonderful job with the long arm at Quilter's Cocoon.  Lisa is a saint. Not sure how to go about nominating her to the Vatican for Sainthood:)


Saturday, November 1, 2014

Four-In-Art: Urban Light Reveal

Southern California Satellite View

As I shared in a recent post, I've been working on an Urban Lights quilt for the Four-In-Art group. A satellite photo of Southern California was my inspiration for the project.


Here's my Urban Lights project called 
Phosphorescent Freeways

From the satellite images I found I was fascinated with the glowing lines going back and forth that created all the streets and the clusters of lights created by cities, arenas, freeways and airports. There were also lots of dark areas from beaches, bays, mountains and undeveloped land. It seemed totally fitting to finally use that glow-in-the-dark thread I've been patiently waiting to use. Here's a photo of Phosphorescent Freeways glowing in the dark. I actually had to buy an app for my ipad that allowed me to take a photo with a long exposure to pick up the light from the glowing thread. 


Phosphorescent Freeways with glowing thread and long exposure.
It's amazing how the longer exposure time still doesn't capture 
all the glowing lines, boo hoo.

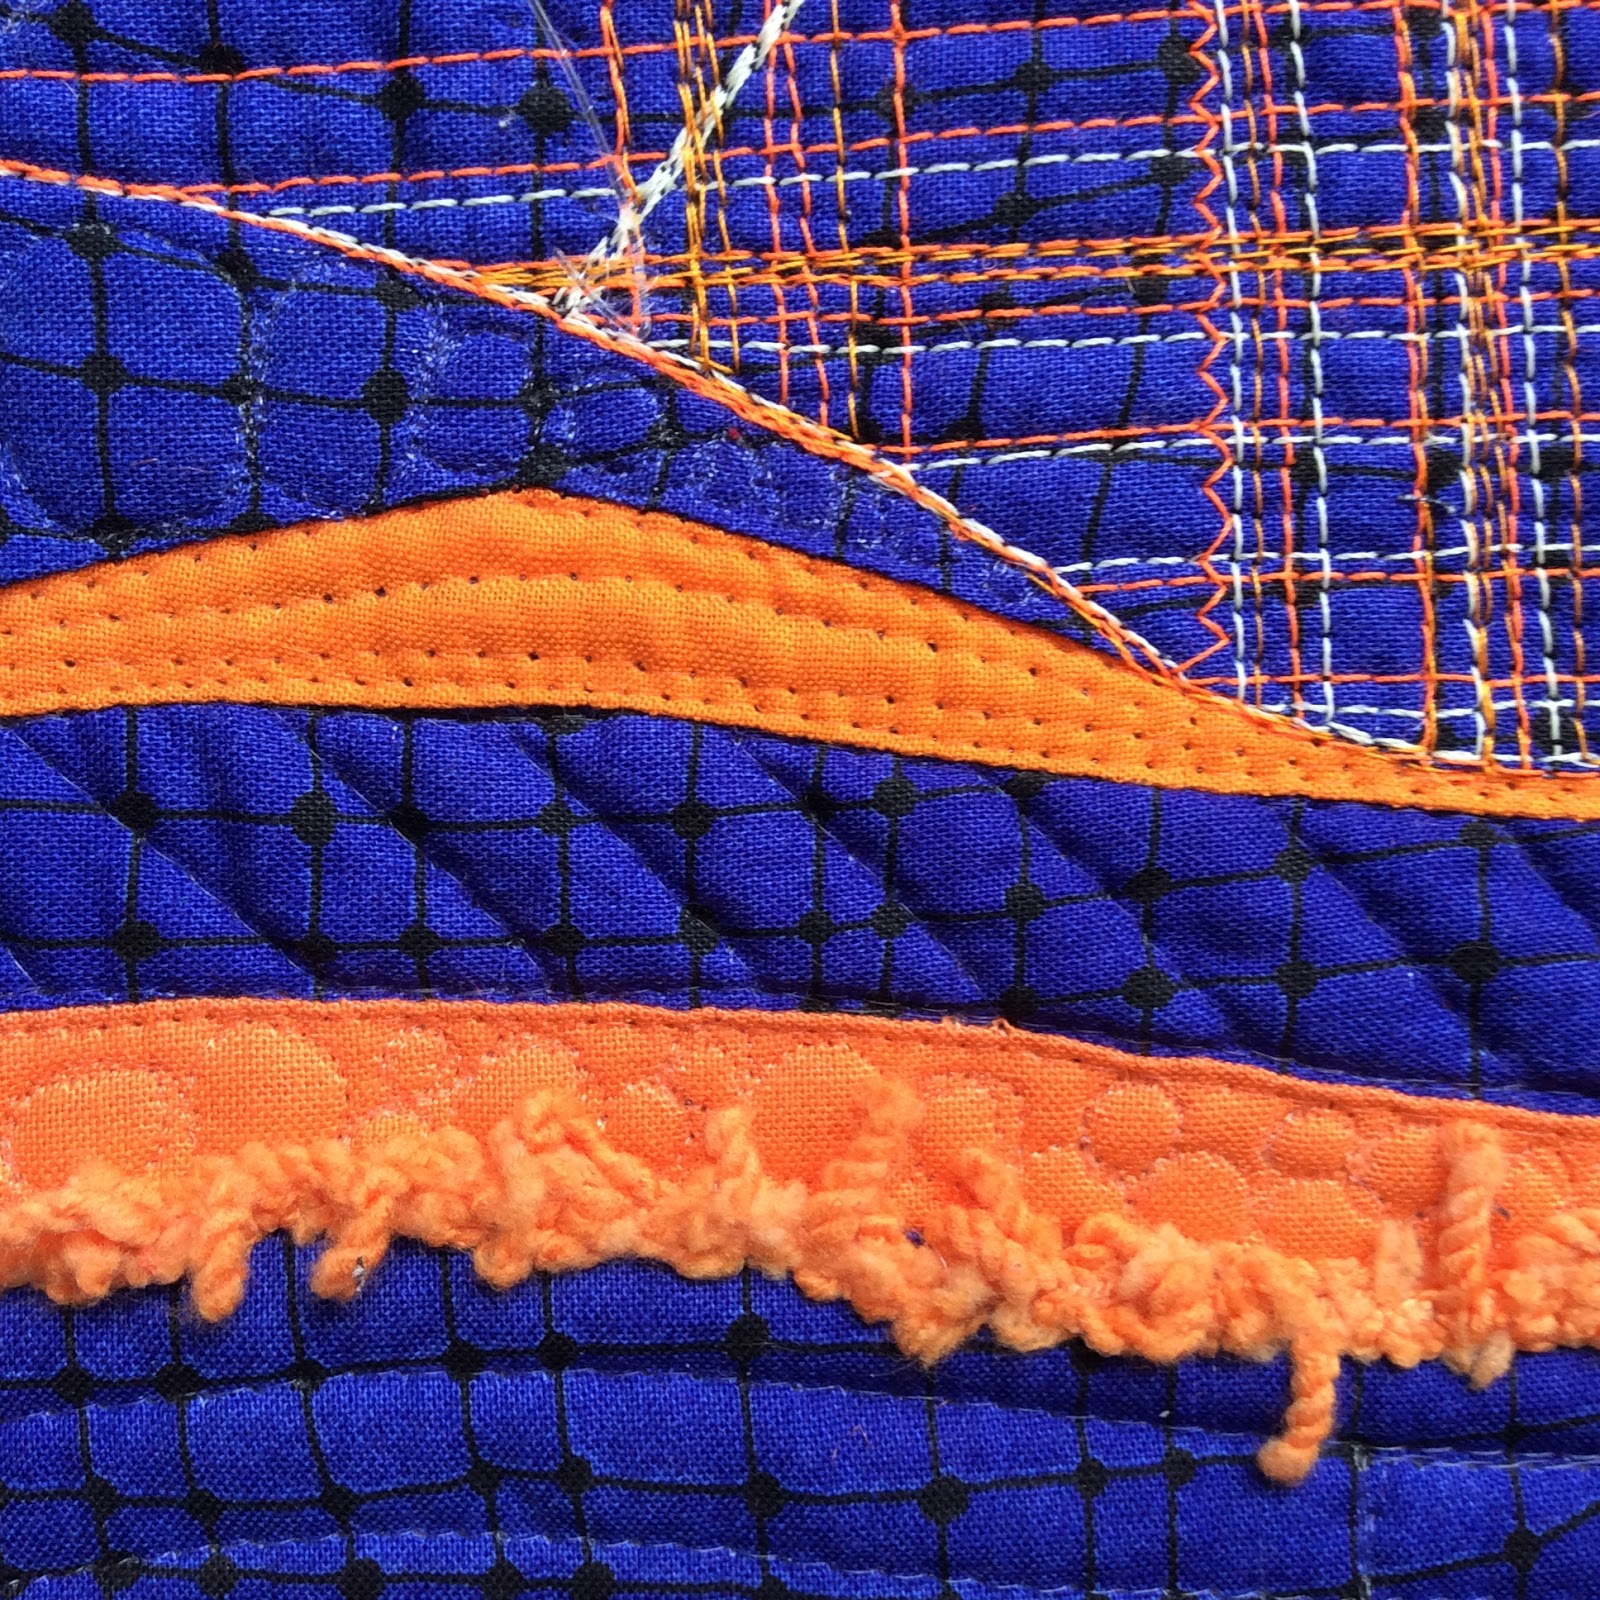
I just have to say that I TOTALLY LOVED doing this project. It was so fun to piece together the blue and orange (two colors I usually avoid due to their painful visual contrast, but for this project blue was a fitting representation of the dark night and orange worked for the nighttime lights). I knew that there would be an overwhelming number of straight lines going back and forth so I inserted some orange waves of fabric to off-set the rigidity of the street lines. I used 5 different colors of thread in the project to show different hues of orange that I saw in the satellite images.  I created circular pockets of glowing thread, squares of orange thread, and zigzags of yet more orange thread to represent intersecting freeways. I also used a couching technique to secure clear plastic fishing line and orange yarn to the quilt. One of my original ideas was to use the couching method to secure lots of fuzzy orange yarn to create a glowing look for the streets, but as the quilt progressed the fuzzy-soft look I envisioned didn't seem to work well with the technical look of all the streets/thread criss-crossing around. 
Clear fishing line on the left and lots of orange streets.


Superior Thread's Mono Poly Invisible Monofilament was used for quilting all the dark blue areas. I didn't want to distract from the orange lines that were quilted, so it seemed like a good way to create more visual interest without taking away from the punch of the orange thread on the blue fabric. I quilted the word Darkness into the quilt because without darkness you can't see the city lights in the satellite images. I also quilted lots of circles into the quilt with the mono filament because lights are often round shapes such as: stoplights, headlights, spotlights, and recessed ceiling lights.

I also used orange burlap to create visual interest to help move the eye around the composition of the quilt. The burlap is also in round shapes to reiterate the circular lights we see all around us. 
Darkness quilted with mono filament and burlap in circle shape.

 Randomly sized stoplight circles stitched in Mono 
Filament in a tall a skewed stack. 
It was most memorizing and almost addicting 
to stitch the circles.

Attaching the faced binding.

One of my favorite parts, seeing the quilt during the 
inverting process of turning the binding to the back side!

Back side of the quilt. I wanted the backside to look like a picture 
frame for the red-orange & black batik. 

Until the next blog post.
Tchau
That's goodbye in Portuguese.

Check out these other Four In Art quilts.

Amanda Kattner blogs at www.whatthebobbin.com

Betty Ayers has a  Flickr site at https://www.flickr.com/photos/toot2/with/12251011196 

Elizabeth Eastmond blogs at www.opquilt.com

Nancy Myers blogs at patchworkbreeze.blogspot.com

Rachel  blogs at rachel-thelifeofriley.blogspot.com